Note: Sep 2015 - This tutorial has been updated for iOS9/Swift2.
This is iOS Animations by Emails for April 2015. It features a tutorial on a cool animation library called Ophiuchus.
I discovered a number of very cool animation libraries this month - it's been a true animations galore on Github! Until the very last moment I started writing this newsletter I was hesitating, which library to cover in this month's issue but Ophiuchus made the cut because I came up with a very cool tutorial project that does an homage to Steve Jobs and the Think Different campaign.
- Marin Todorov
Tutorial: Text animations with Ophiuchus
This tutorial is designed for Xcode 7/Swift 2 or a compatible version.
Ophiuchus is an open source library from Yalantis - the makers of a number of open source libs on GitHub related to animations. Here are some of their open source stuff, which definitely look very polished:
I chose to cover Ophiuchus in this month’s issue because it really goes beyond the call of duty to combine APIs from different frameworks to create an incredibly fine animation. At the same time the animations are very flexible and you can adjust them to your very own needs.
Here’s an example of an Ophiuchus animation from their GitHub readme:
As you can see this is a non- trivial animation that can really give your app a “style boost”.
In this tutorial you are going to learn how to use Ophiuchus to create a Think Different homage:
By the author of iOS Animations by Tutorials.
1. Getting started with Ophiuchus
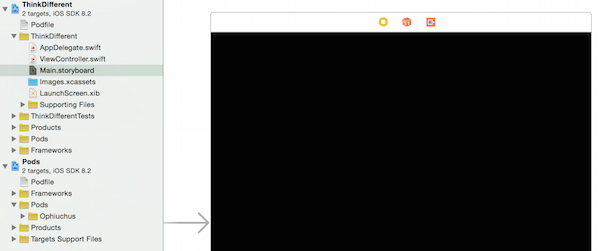
Create a new Single View Xcode project and call it ThinkDifferent. Import the cocoapod called “Ophiuchus” and launch the resulting Xcode workspace file.
Create an Objective-C bridging header and import the Ophiuchus classes you are going to use:
#include "YALLabel.h"
#include "YALPathFillAnimation.h"
Note: If you aren’t familiar with Cocoapods have a look at Chapter 25, Getting started with Pop from iOS Animations by Tutorials 2nd Ed. - it walks you through installing a Cocoapod in your Xcode project and how to create an Objective-C bridging header.
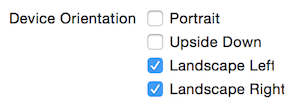
Open the target General properties and disable Portrait mode:
As the final step of the project setup set the default view controller to have black background:
It’s time to write some code!
Let’s add a single piece of text on screen so you can get your hands dirty with YALLabel. Since you are going to be creating many labels for your animation later on - let’s create a factory method that makes a label.
In ViewController.swift add a new method to the ViewController class:
func labelWithText(text: String) -> YALLabel {

    let label = YALLabel(frame: view.bounds)
    label.center = view.center

    label.text = text
    label.fontName = "HelveticaNeue"
    label.fontSize = 70.0

    return label
}
This code creates a YALLabel instance as big as the screen and centers it. You set the font to HelveticaNeue and the text size to 70pt (this will make the text fill up nicely an iPhone 6’s screen width)
As you can see the API is a bit different than UILabel but it’s easy to pick up.
Now let’s use the custom drawing capabilities of YALLabel. Insert the following code in labelWithText(_:) just before the return line:
label.strokeColor = UIColor(red: 1.0, green: 1.0, blue: 0.5, alpha: 0.85)
label.strokeWidth = 2
label.fillColor = UIColor.redColor()
label.backgroundFillColor = UIColor(white: 0.25, alpha: 1.0)
Keep that thought and add the code to display the label on screen:
override func viewDidAppear(animated: Bool) {
    super.viewDidAppear(animated)

    let label = labelWithText("Think Different")
    view.addSubview(label)
}
Run the project and let’s have a look at the result:
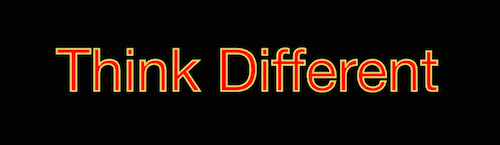
The text stroke width is 2pt and the stroke color is the light yellow you set to strokeColor. Each character is filled with the red color you set to fillColor.
So far so good! But what does the backgroundFillColor do?
This is the background color of each character when it’s not filled. Right now you can’t see the background color because all characters are 100% filled with red - but in few moments when you start animating the fill you will observe how fillColor and backgroundFillColor work together.
2. Add the basic animation flow
Now you need to add a bunch of code to make the separate phrases of the final animation come in and go out of the screen. If you worked through the View animations section of iOS Animations by Tutorials you should be very familiar with what you are about to do in this part of the tutorial.
Add a new helper method to ViewController:
func delay(seconds seconds: Double, completion:()->()) {
    let popTime = dispatch_time(DISPATCH_TIME_NOW, Int64( Double(NSEC_PER_SEC) * seconds ))

    dispatch_after(popTime, dispatch_get_main_queue()) {
        completion()
    }
}
This is a simple method that executes a code closure after a given delay. It’ll help you schedule the different stages of the animation.
Back in labelWithText(_:) add one last piece of code - just above the return line:
label.transform = CGAffineTransformMakeTranslation(0.0, -view.frame.size.height/2 - 40)
You apply a translation transform to your label so it will be position just above the screen edge like so:
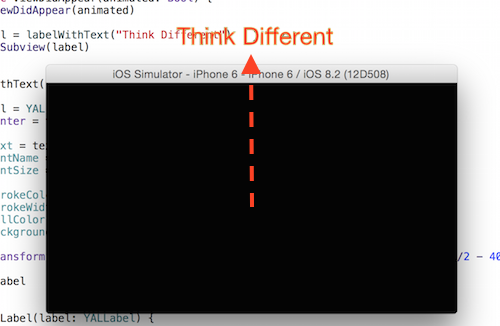
Next - you will add a method to animate the label down to the center of the screen and then continue animating until it reaches the bottom of the screen. Then you would remove the label since a new one will be already coming at the same time from the top.
Add this new method to create the movement animation:
func animateLabel(label: YALLabel) {

    UIView.animateWithDuration(1.0, delay: 0.0, options: .CurveEaseOut, animations: {

        label.transform = CGAffineTransformIdentity

        }, completion: nil)

    UIView.animateWithDuration(1.0, delay: 2.5, options: .CurveEaseIn, animations: {
        label.transform = CGAffineTransformMakeTranslation(0.0, self.view.frame.size.height/2)
        label.alpha = 0.25

        }, completion: {_ in
            label.removeFromSuperview()
    })

}
You create two view animations. The former resets the label transform, which will move it to the center of the screen. The latter creates a translation transform to move the label to the bottom of the screen; the completion parameter simply removes the label from the view.
You can see your progress so far by adding this line to viewDidAppear(_:):
animateLabel(label)
Run the project and you will see the basic movement animation:

It’s a nice animation and it sets the ground for the even cooler text fill animation that you will get to code in a moment!
To wrap up this lengthy preparation phase do the following changes.
First replace viewDidAppear(_:) with:
override func viewDidAppear(animated: Bool) {
    super.viewDidAppear(animated)

    let text = [
        "Here’s to", "the crazy ones.", "The rebels.", "The troublemakers.", "The ones who see", "things differently.",
        "While some", "may see them", "as the crazy ones,", "we see genius.", "Because the people", "who are crazy", "enough",
        "to think they can", "change the world,", "are the ones", "who do."
    ]

    animate(text)
}
In this new implementation you create an array of phrases of the shortest variant of the Think Different ad. (source: http://en.wikipedia.org/wiki/Think_different#Text)
Finally you pass the complete text to a method called animate(_:) and yes - the method does not exist yet; let’s add it now:
func animate(var strings: [String]) {
    if strings.count == 0 {
        return
    }

    let label = labelWithText(strings.removeAtIndex(0))
    view.addSubview(label)

}
The animate(_:) method will keep calling itself until it has animated all phrases on screen - that’s why you start it off with a check if there’s any phrases left in the strings parameter.
If there’s at least one phrase left - you get it from the strings parameter and create a label to display it.
Next you will animate the label (your animation code is already written), add:
delay(seconds: 0.1, completion: {
    self.animateLabel(label)
})
This will run the movement animation in animateLabel(_:) on the current piece of text. When this animation is almost finished you will show the next piece of text - add to animate(_:):
delay(seconds: 2.2, completion: {
    self.animate(strings)
})
This will keep calling animate(_:) every 2.2 seconds - this will be enough time for your animations to run on each of the phrases before it disappears.
Build and run and enjoy the animation so far:

3. YALPathFillAnimation
In this part you will finally get to work with YALPathFillAnimation and create some cool fill animations.
Each YALLabel has three properties called:
strokeLayerfillLayer- and
backgroundLayer
Those three layers ultimately inherit CAShapeLayer so you can animate their progress, color, and so on. The three layers draw the stroke, fill, and background of YALLabel.
The class YALPathFillAnimation helps you easily animate the text’s fill so you are going to use it to create a basic animation going.
First you will fetch the fill layers for each character in the currently visible text. Add to animateLabel(_:):
let letters = label.fillLayer!.sublayers as! [YALProgressAnimatingLayer]
The sub-layers of YALLabel’s fillLayer will give you an array of the fill layers for each letter. Each of those layers is a YALProgressAnimatingLayer - a class that inherits from CAShapeLayer and allows you to animate a shape’s fill.
Now you can enumerate over the character layers and run a fill animation on each - add:
for letter in letters {
    let fill = YALPathFillAnimation(path: letter.mask.path, andDirectionAngle: 180.0)
    fill.duration = 1.5
    fill.timingFunction = CAMediaTimingFunction(name: kCAMediaTimingFunctionEaseOut)
    letter.mask.addAnimation(fill, forKey: nil)
}
For each letter you create a YALPathFillAnimation which takes the character’s mask path and a direction angle. The latter parameter allows you to decide the direction the fill animates. If you use an angle of 0.0 degrees the fill animates upwards, for a 180.0 degree angle the fill animates downwards.
YALPathFillAnimation inherits from CABasicAnimation so you can use all properties you are used to tweak in your layer animations like duration, timingFunction, fillMode, etc.
Note: If you need a refresher on layer animations, fillMode, timingFunction and the like you can do a quick read of Chapter 8, Getting Started with Layer Animations from iOS Animations by Tutorials 2nd Ed..
This initial version of the fill animation looks like this:

Cool! You’re heading in the right direction - a couple more tweaks and you will have the final animation ready.
Time offsetting
Next - you will give each character’s fill animation a bit of time offset. Just before the for loop insert:
    let deltaTimeOffset = 2.0 / Double(letters.count)
    var timeOffset = CACurrentMediaTime() + 0.5
You divide the total animation time of 2.0 seconds over the number of characters and store the result in deltaTimeOffset.
You will keep adding deltaTimeOffset to timeOffset after you kick off the animation for each character to get the proper begin time for each animation.
Find the line: letter.mask.addAnimation(fill, forKey: nil) and just before that line insert:
fill.fillMode = kCAFillModeBackwards
fill.beginTime = timeOffset
timeOffset += deltaTimeOffset
This code will make the text appear filled with its background color (because it will appear 0% filled thanks to the animation’s fill mode) and each character animation will get time offset by deltaTimeOffset.
Run the project:

The time offset you apply to each animation creates an “animation wave” effect - things are starting to look cool!
Left to right and vice versa
To make the effect a bit more varied let’s change the direction of the fill wave for each phrase.
First add a new class property, which you will use as a flag for the animation direction:
var isOdd = true
Find the line: let letters = label.fillLayer!.sublayers as! [YALProgressAnimatingLayer].
Replace it with:
let letters = (isOdd ? label.fillLayer!.sublayers : label.fillLayer!.sublayers!.reverse())  as! [YALProgressAnimatingLayer]
isOdd = !isOdd
You alternate the natural text flow with its reverse for each phrase animation. When you run the project now you will see the “fill wave” go once from left to right then from right to left and so on.
You can randomize or shuffle the characters in the text any way you want for even crazier effects.
Adding rainbow effect
In this final part of the tutorial you will change the fill color of each of the characters to a different color to achieve a “rainbow effect” and make the animation even cooler.
To generate all the different colors to use for each character you are going to use UIColor(hue:, saturation: , brightness: , alpha: ). This convenience initializer takes in a hue value between 0.0 and 1.0, which determines a color’s position on the color wheel:
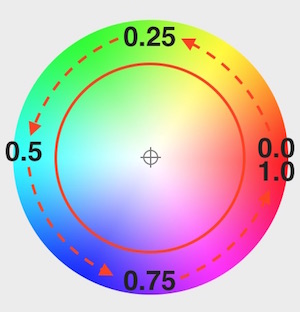
Your plan how to get all colors is very simple - divide 1.0 over the amount of characters to get the delta between each two letter’s hue values. Then before creating the animation for each character change its fillColor to create the rainbow.
Back in animateLabel(_:) insert these two lines just before the for loop:
let deltaHue: CGFloat = 1.0 / CGFloat(letters.count)
var currentHue: CGFloat = 0.0
For each phrase you will start from hue 0.0 (red color) and will have deltaHue difference between the hue of each letter with the last letter eventually having hue 1.0 (red color again).
Now let’s add the code to do that, immediately after the line of the for loop insert:
letter.fillColor = UIColor(hue: currentHue, saturation: 1.0, brightness: 1.0, alpha: 1.0).CGColor
currentHue += deltaHue
This code sets each character’s fill color and increases currentHue to the value for the next character in the phrase. Easy peasy!
Run the project one more time to check the final rainbow animation:
And the animation is finished! I hope you enjoyed the ride and definitely check out the Ophiuchus GitHub repository.
For the ones enjoying the idea of the Think Different homage - there’s one last optional step. Add this piece of code to viewDidAppear(_:) and watch the complete animation till the end:
let apple = UILabel(frame: view.bounds)
apple.font = UIFont(name: "HelveticaNeue", size: 160.0)
apple.textColor = UIColor(white: 1.0, alpha: 0.5)
apple.text = ""
apple.textAlignment = NSTextAlignment.Center
apple.alpha = 0.0
view.addSubview(apple)
UIView.animateWithDuration(5.0, delay: 40.0, options: [], animations: {
apple.alpha = 1.0
}, completion: nil)
This is how the completed animation looks like: