Note: Sep 2015 - This tutorial has been updated for iOS9/Swift2.
Hello from San Francisco! I'm here for the WWDC week and you can find me most of the time hanging around at http://www.altconf.com. Friday the 12th at 9:00AM come and visit my talk "Power up your animations" - the AltConf tickets are free!
This month I finally had the time to sit down and work on an old idea for an open source animation library. Last week I've put online the first beta version and I called it EasyAnimation. As you gonna see in this tutorial the library really makes some things ... very easy :)
Enjoy!
- Marin Todorov
Tutorial: Introduction to EasyAnimation
This tutorial is designed for Xcode 7/ Swift 2 or a compatible version.
In Section I , View animations and later in Section III, Layer animations of iOS Animations by Tutorials 2nd Ed. I compare creating animations for your views and then for your layers.
If you put UIKit and CoreAnimation code side by side the former looks really cleaner and more readable. The UIKit animation is a simple code block that "detects" any changes you make to your views and animates from the current values to the desired target values:
//UIKit view animation
UIView.animateWithDuration(2.0, animations: {
    self.view.center.x = 200.0
})
With CoreAnimation on the other hand you need to create an animation model object, configure it and then send it off to the CoreAnimation server like so:
//CoreAnimation layer animation
let anim = CABasicAnimation(keyPath: "position.x")
anim.fromValue = 100.0
anim.toValue = 200.0
anim.duration = 2.0
anim.fillMode = kCAFillModeBackwards
anim.beginTime = CACurrentMediaTime() + 2.0
anim.timingFunction = CAMediaTimingFunction(name: kCAMediaTimingFunctionEaseOut)
view.layer.addAnimation(anim, forKey: nil)
EasyAnimation aims to reduce drastically the lines of code you need to write to create layer animations and to extend the existing UIKit animation methods whenever they fall short in doing what you really want them to.
In this tutorial you will learn how to very easily try animations for your layer properties, how to create layer spring animations, and (my favorite) very easily chain animation in sequences and groups.
By the author of iOS Animations by Tutorials.
Getting started
Do avoid asking you to create an Xcode project and setting up the UI with Auto Layout I’ve prepared a starter project for you.
Download EAImagePreview-Starter.zip, extract the contents of the archive, and open EAImagePreview.xcodeproj.
EAImagePreview is a simple project that shows a list of photos and when the user taps on one of them it displays a full size version of the photo.
Click on Main.storyboard to see the project setup:
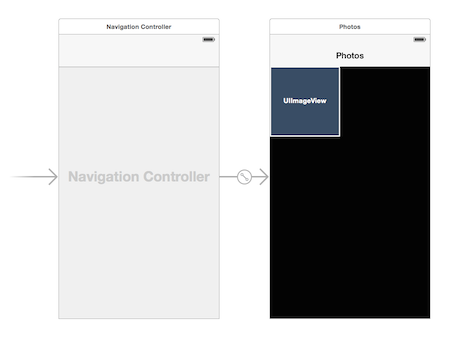
There is a single collection view with a cell that displays a photo thumbnail - all the code to feed the collection view with photos is already inlcuded in the ViewController extension at the bottom of ViewController.swift.
In fact you can run the project right away to see the starter app:
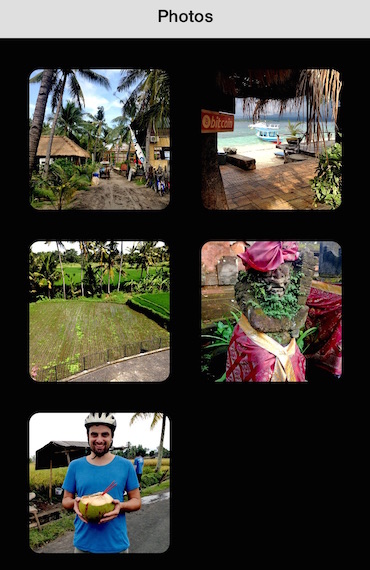
Tap on an image and you will see it in full size. Tap on the full size image and it will disappear. The starter app is rather plain and your task will be to jump in and by using EasyAnimation - add some spice to it!
First of all create a Podfile and include the EasyAnimation pod to your project:
use_frameworks!
pod 'EasyAnimation'
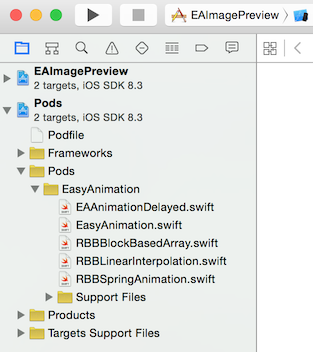
Then install the pod and re-open the Cocoapods powered workspace; you should see the EasyAnimation source files under the Pods project in the workspace:
Now you are ready to try out some code!
Open ViewController.swift from the starter project (not the Pods project) in the workspace and find the showImage(image:) method. This is the method that shows the full size image on screen. What the existing code does is to create an image view (imgView) and add it to the preview view on screen.
Here you are going to add few animations in order to get a taste of what EasyAnimation lets you do.
The first thing you will do is fade out and move away the list of photos before you show the full size image. Find this line and delete it:
self.preview.addSubview(imgView)
In its place insert:
UIView.animateWithDuration(0.25, delay: 0.0, options: .CurveEaseIn, animations: {
    //animate collection view
    self.collectionView.transform = CGAffineTransformMakeTranslation(-30.0, 0.0)
    self.collectionView.alpha = 0.5

}, completion: {_ in

    //show the image view
    self.preview.addSubview(imgView)
})
You certainly have used this method many times to animate views in your app. If you give the app a try you will see the animation fade out and translate the photos list and then show the full size image:

Now - what to do if you want to add another animation that should start after your fist one has completed? The way you would do that is to create another animation inside the completion block of the first one. And if you want a third one - create it inside the completion block of the second one and so forth...
This road will inevitably lead you to code formatting hell since you will have many nested blocks and Xcode isn't all that good in offsetting correctly code blocks as method parameters...
Let's look at what EasyAnimation offers to solve this issue. EasyAnimation adds a new method on the UIView class that lets you easily chain animations in a sequence:

Scroll to the top of ViewController.swift and import EasyAnimation:
import EasyAnimation
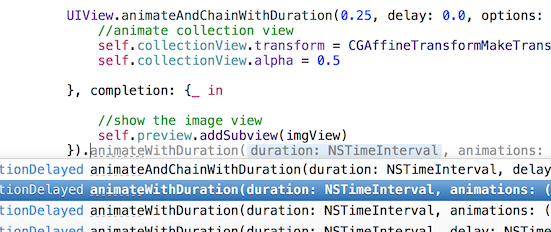
Now scroll back to showImage(image:) and replace animateWithDuration with animateAndChainWithDuration. Since the chain method takes the same parameters as the original method replacing only the method name should be just fine and you should end up with:
UIView.animateAndChainWithDuration(0.25, delay: 0.0, options: .CurveEaseIn, animations: {
   //animate collection view
   ...
If you run the app right now it will behave exactly the same way as before.
However if you go back to your code and just put in a "." after the closing bracked of your animation method call Xcode will offer you to chain another animation to it. Like so:
I dare say that's pretty "sweet" :)
Add a spring animation to your animation sequence - your complete animation code should look like that:
UIView.animateAndChainWithDuration(0.25, delay: 0.0, options: .CurveEaseIn, animations: {
    //animate collection view
    self.collectionView.transform = CGAffineTransformMakeTranslation(-30.0, 0.0)
    self.collectionView.alpha = 0.5

}, completion: {_ in

    //show the image view
    self.preview.addSubview(imgView)
}).animateWithDuration(2.0, delay: 0.0, usingSpringWithDamping: 0.25, initialSpringVelocity: 0.0,
    options: [], animations: {

    //second animation here

}, completion: nil)
This code will first run your animation, then execute the code in the its completion block, and finally run the animations you are going to add in your second animation call.
Insert just below //second animation here (inside the second animations block):
self.collectionView.transform = CGAffineTransformMakeTranslation(-100.0, 0.0)
Your second animation just moves the collection a bit more to the left. If you run the app you will see the list bounce a bit as part of the complete sequence. The two animations seamslessly fit together since internally EasyAnimation uses the completion block to chain them together for you.
Now let's use another feature of EasyAnimation. How about spicing up things a bit and adding some layer animations?
Just below the last line you add:
imgView.layer.borderWidth = 5.0
Yes - with EasyAnimation that just works. Instead of having to create a CABasicAnimation object and all that jazz you can just animate layer properties the same way you animate view properties.
Run the app and check out the little border animation that kicks off when full size image pops up. Notice how the border also bounces a bit - it's a spring animation too!

In fact UIKit takes care of some of the layer animations itself too. For example if you animate the layer transform UIKit takes care of that animation automatically. The best thing is that you don't need to care which animation is picked up by UIKit and which one by EasyAnimation, as long as they all work :) Add:
var imgFlip = CATransform3DIdentity
imgFlip.m34 = -1.0 / 1000
imgFlip = CATransform3DRotate(imgFlip, CGFloat(-M_PI_4), 0.0, 1.0, 0.0)
imgFlip = CATransform3DTranslate(imgFlip, 100.0, 0.0, 0.0)

imgView.layer.transform = imgFlip
Note: If you need some more explaining about the 3D transform code have a look at Section IV, 3D Animations from iOS Animations by Tutorials.
Now the animation looks much better:
![]()
To wrap up with the animation you will add one more animation to the sequence to show a nice shine around the full size photo.
First scroll up and just before you call UIView.animateAndChainWithDuration insert:
    imgView.layer.shadowColor = UIColor.whiteColor().CGColor
    imgView.layer.shadowOffset = CGSize(width: 0, height: 0)
    imgView.layer.shadowOpacity = 0.9
This code will setup the image view shine (technically it's a white drop shadow, but in practice it looks like a nice white shine). Now add one more animation to the sequence to animate the shine:
    ...
    imgView.layer.transform = imgFlip

}, completion: nil).animateWithDuration(2.0, delay: 0.25, usingSpringWithDamping: 0.25, initialSpringVelocity: 0.0,
    options: [], animations: {
    //increase the shadow radius (by default it's 3.0)
    imgView.layer.shadowRadius = 30.0
}, completion: nil)
Run and enjoy the full animation sequence:
If you want to polish the effect a little bit more scroll to closeImage(tap:) and wrap the complete method code inside an animation call. Closing the full size image should look much better now.
In this short tutorial you learned how to:
- chain animations in a sequence
- group view and layer animations in a single same animation call
- create spring animations for layer properties
- mix UIKit and EasyAnimation animations
If you want to see more EasyAnimation examples clone the repo from GitHub and run the demo app: https://github.com/icanzilb/EasyAnimation.
If you'd like to peak into the bleeding edge code check out the dev-marin branch: https://github.com/icanzilb/EasyAnimation/tree/dev-marin.
Where to go from here?
Revisit all chapters in Section III, Layer animations from iOS Animations by Tutorials - that ought to give you some ideas how to re-write your layer animations and make the code simpler by using EasyAnimation.
If you get to do some work using EasyAnimation or want to talk features/bugs ping me by replying to this email or on Twitter at @icanzilb.