Hello everyone!
I skipped an issue of this newsletter because I was hard at work on iOS Animations by Tutorials 2nd edition and the brand new 2D iOS & tvOS Games by Tutorials (formerly iOS Games by Tutorials). If you want to learn more about either topic do check the links provided :]
In the last few months I gave a number of animation workshops and presentations and it seems like people really love my CAReplicatorLayer demos. That's why I decided to create another little lighthearted replication demo for this month's issue.
Enjoy!
- Marin Todorov
Tutorial: Uberworks
This tutorial is designed for Xcode 7.1 and Swift 2
The story of this month's project goes back to the time before I started this newsletter. In fact, I was in DC for RWDevCon where I was to announce iOS Animations by Tutorials and this newsletter to the world. I got a beautifully crafted email with subject "Forget your keys" from Uber and it featured a fireworks animation I instantly felt in love with. You can see the same animation embedded in this tweet:
So - this fireworks animation has been on my to do list for about 8 months and now it's the time to look into recreating it using Core Animation and CAReplicatorLayer.
By the author of iOS Animations by Tutorials.
Getting started
To avoid asking you to create an Xcode project and import libraries I’ve prepared a starter project for you. Download Uberworks-starter.zip, extract the contents of the archive, and open Uberworks.xcodeproj.
The project contains an empty black view controller to start with and the EasyAnimation library. (More about EasyAnimation you can learn in the June issue)
To recreate the fireworks you are going to create few animations and you are going to add all the necessary code in ViewController.swift.
Let's get to coding!
Creating a light trail
First you are going to create the light trail that the firework leaves behind while it's being shot in the air.
Add a helper method to ViewController:
func animatedLineFrom(from: CGPoint, to: CGPoint) -> CAShapeLayer {
  let linePath = UIBezierPath()
  linePath.moveToPoint(from)
  linePath.addLineToPoint(to)

}
animatedLineFrom(_:to:) will create a shape layer and return it to you to add in the layer hieararchy. This method will also create and run the animations on the layer so you can just display it straight away.
The first chunk of code, already in, creates a bezier path to describe the shape you will draw on screen. For the firework trail you draw just a striaght line from point from to point to provided as parameters.
Now add the code to create the layer at the bottom of animatedLineFrom(_:to:):
let line = CAShapeLayer()
line.path = linePath.CGPath
line.lineCap = kCALineCapRound
line.strokeColor = UIColor.cyanColor().CGColor

return line
This code creates a layer to draw the line you've setup in cyan color and returns it as the result of the method.
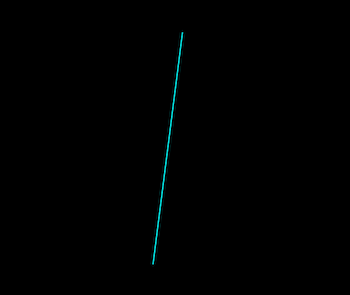
Now let's give it that a try. In viewDidLoad() add:
view.layer.addSublayer(
    animatedLineFrom(CGPoint(x: 160, y: 550), to: view.center)
)
This code creates a cyan line and adds it on screen:
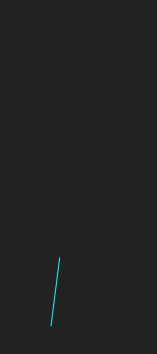
Next - we are going to animate the beginning and end of the line to recreate the light trail animation. Back in animatedLineFrom(_:to:) insert just before return line:
line.strokeEnd = 0.0
UIView.animateWithDuration(1.0, delay: 0.0, options: [.CurveEaseOut], animations: {
    line.strokeEnd = 1.0
}, completion: nil)
This will set the end point of the line at the beginning (e.g. the line will be drawn 0% through). Then it will animate the end point back to the end of the path to draw (e.g. it will animate the line from being drawn 0% to 100%).
More details about how strokeEnd and strokeBegin work you can find in Chapter 15, Stroke and Path animations of iOS Animations by Tutorials.
Run the app to see the effect of animating strokeEnd:

Now to make that animation resemble a trail that disappears after a short interval of time add a second animation:
UIView.animateWithDuration(0.75, delay: 0.9, options: [.CurveEaseOut], animations: {
    line.strokeStart = 1.0
}, completion: nil)
This will animate the beginning of the line towards the end to make the line disappaer:

Cool - the first part of a firework animation is complete!
Your first firework
Now we come to the more interesting part of any firework - the explosion!
For the explosion you are going to use a replicator layer. If you are not familiar with the CAReplicatorLayer class I recommend Chapter 16, Replicating Animations from iOS Animations by Tutorials.
Add a new helper method to ViewController, which will create a firework ready to be added to the view hierarchy:
func firework1(at atPoint: CGPoint) -> CAReplicatorLayer {
    let replicator = CAReplicatorLayer()
    replicator.position = atPoint

    return replicator
}
This method stub creates an empty replicator layer and returns it. You will add all the animation code in this method just before the return replicator line.
Let's start by creating a line path for each of the exploding particles (just like you created a line path earlier). Add in firework1(at:):
//line path
let f11linePath = UIBezierPath()
f11linePath.moveToPoint(CGPoint(x: 0, y: -10))
f11linePath.addLineToPoint(CGPoint(x: 0, y: -100))
f11linePath stands for "the path of the first line of the first type of firework" :) The rest of the code is the same as before.
Now, again just like before, add a shape layer to draw the line on screen:
//line 1
let f11line = CAShapeLayer()
f11line.path = f11linePath.CGPath
f11line.strokeColor = UIColor.cyanColor().CGColor
replicator.addSublayer(f11line)
You create the line layer and set its color to cyan and finally you add it to the replicator layer.
Now scroll back to viewDidLoad() and append the code to create a firework:
delay(seconds: 1.0, completion: {
  self.view.layer.addSublayer(self.firework1(at: self.view.center))
})
This should give you the first line of the explosion, appearing right on time:
Now let's use the superpowers of CAReplicatorLayer; back in firework1at(_:) append:
replicator.instanceCount = 20
replicator.instanceTransform = CATransform3DMakeRotation(CGFloat(M_PI/10), 0, 0, 1)
This will replicate your explosion line and make the replications arrange in a circular shape like so:

You have probably guessed that the next animation you are about to add is one that animates strokeEnd just like you did before. Add this code to do that:
f11line.strokeEnd = 0
UIView.animateWithDuration(1.0, delay: 0.33, options: [.CurveEaseOut], animations: {
    f11line.strokeEnd = 1.0
}, completion: nil)
You're doing nice progress, have a look at that smooth explosion:

Now - let's add a second pattern in the explosion. This is going to be another shape layer that you are going to add to the replicator so the code is mostly identical to what you already did.
Insert:
//line path 2
let f12linePath = UIBezierPath()
f12linePath.moveToPoint(CGPoint(x: 0, y: -25))
f12linePath.addLineToPoint(CGPoint(x: 0, y: -100))
f12linePath.applyTransform(CGAffineTransformMakeRotation(CGFloat(M_PI/20)))
You draw a line just like before but this time you give a little bit of rotation too - this will make sure that the second line does not appear over the first line.
Add the code to create the second shape layer and add it to the replication:
let f12line = CAShapeLayer()
f12line.path = f12linePath.CGPath
f12line.lineDashPattern = [20, 2]
f12line.strokeColor = UIColor.cyanColor().CGColor
replicator.addSublayer(f12line)

f12line.strokeEnd = 0
Just like before you create a line layer and you set its color to cyan. This time around you ask the shape layer to draw a dashed line - you set the pattern to be: 20 points on, 2 points off (e.g. the layer will draw for 20 points, then will skip 2, and then will draw another 20, etc.)
You set strokeEnd to 0 and the layer is ready for an animation. Add:
UIView.animateWithDuration(1.0, delay: 0.0, options: [.CurveEaseOut], animations: {
  f12line.strokeEnd = 1.0
}, completion: nil)

Your basic firework is ready! Now you can polish it some more to make it look real nice!
Let's make it disappear via a cool animation. Add:
UIView.animateWithDuration(1.0, delay: 1.0, options: [.CurveEaseIn], animations: {
  f11line.strokeStart = 1.0
  f12line.strokeStart = 0.5
}, completion: nil)
Just like earlier you animate strokeStart to make the line "undraw" itself:

Let's add more animations to the final transition - append inside the last animations block you added:
f11line.transform = CATransform3DMakeRotation(CGFloat(M_PI_4), 0, 0, 1)
f12line.transform = CATransform3DMakeRotation(CGFloat(M_PI_4/2), 0, 0, 1)

replicator.opacity = 0.0
This code will make the two line patterns rotate and will fade out the whole replicator layer to make it like the explosion fades out naturally.

Neat! That's a real cool firework and it looks much like the original too.
If you decide to reuse this code in your app don't forget that at the end of the animation, even if the firework and its layer aren't visible they are still in the hierarchy so you need to remove them manually after the explosion has finished.
Your second firework
Now, just for fun, you are going to create a second type of firework much like another one of the fireworks you see in the Uber video.
First add a helper method that creates a cyan dot:
func animatedDot(withDistance delta: CGFloat, delay: Double) -> CALayer {
  let dot = CALayer()
  dot.backgroundColor = UIColor.cyanColor().CGColor
  dot.frame = CGRect(x: 0, y: -10, width: 1, height: 1)

  return dot
}
Like previously the helper method creates a layer, sets its frame and color and returns it. The two method parameters you are going to use in a bit so we won't discuss them right now.
Now let's lay down the basics of the second firework helper method (again pretty similar to what you did earlier):
func firework2(at atPoint: CGPoint) -> CAReplicatorLayer {
  let replicator = CAReplicatorLayer()
  replicator.position = atPoint

  replicator.instanceCount = 40
  replicator.instanceTransform = CATransform3DMakeRotation(CGFloat(M_PI/20), 0, 0, 1)

  return replicator
}
firework2at(at:) creates an empty CAReplicatorLayer, positions it and sets it to 40 instances arranged in a circular shape.
Now just for testing add a cyan dot to the replicator - you will use zeroes as the two parameters since animatedDot(_:delay:) still doesn't make use of them. Insert before return replicator:
replicator.addSublayer(
  animatedDot(withDistance: 0, delay: 0)
)
And to make everything work go to viewDidLoad() and replace self.view.layer.addSublayer(self.firework1(at: self.view.center)) with:
self.view.layer.addSublayer(self.firework2(at: self.view.center))
The difference is a bit difficult to spot - it's "2" instead of "1" in the method name. You can just replace the number by hand.
This should get you started nicely with your second type of firework:

Now you can make the dots from the replication animate in a simple explosion by just translating the original dot a bit. Scroll to animatedDot(_:delay:) and insert before return dot:
UIView.animateAndChainWithDuration(1.0, delay: delay, options: [.CurveEaseOut], animations: {
  dot.transform = CATransform3DMakeTranslation(0, -delta, 0)
}, completion: nil)
This animation adjusts the transform of the dot layer by moving it by "delta" points on the Y axis. For this to have any effect you will need to also to provide a value for the delta parameter when you call animatedDot(_:delay:). In firework2(_:) find animatedDot(withDistance: 0, delay: 0) and replace the first parameter value with 50 like so:
animatedDot(withDistance: 50, delay: 0)
Now you can enjoy this very simple but neat explosion:

Okay - you're almost done. It's time to add more animations to the dot.
In animatedDot(_:delay:) add two more animations to the animation sequence - your animation code should look like that:
UIView.animateAndChainWithDuration(1.0, delay: delay, options: [.CurveEaseOut], animations: {
  dot.transform = CATransform3DMakeTranslation(0, -delta, 0)
}, completion: nil)
.animateWithDuration(2.0, animations: {
  dot.transform = CATransform3DConcat(dot.transform, CATransform3DMakeRotation(CGFloat(M_PI_4), 0, 0, 1))
})
.animateWithDuration(1.0, animations: {
  dot.transform = CATransform3DConcat(dot.transform, CATransform3DMakeTranslation(0, -delta, 0))
  dot.opacity = 0.1
})
In the first part of the sequence you move the dot vertically to animate the explosion. In the next animation that follows you add a bit of rotation to the dot transform property - that will make all dots rotate once they have "exploded". Finally you move the dots away again and fade them out in the same time. It's a nice little routine for them to perform :]

Isn't that so cool to watch :]
Okay - now for the final stretch: let's add more than one dots to that explosion and see how that replicates!
Back in firework2At(_:) find this chunk of code:
replicator.addSublayer(
  animatedDot(withDistance: 50, delay: 0)
)
You will replace this code with a loop that will create 10 dots and give them a little bit more delay and offset distance each to create an elaborate replication animation. Replace the code above with:
for i in 1...10 {
  replicator.addSublayer(
    animatedDot(withDistance: CGFloat(i*10), delay: 1/Double(i))
  )
}
This will create 10 dots and add them to the replicator. Each dot will move different distance after a different time delay. Instead of me explaining what will happen you might as well just run the app:

And that's all for today! I hope you enjoyed creating fireworks and will find them useful in your own apps :]
I captured a video showing an even more polished demo of what you've built today.
The embedded video is rather blurred though - if you want to see a crisp animation featuring the real colors open the video on Vimeo and turn HD on.
Where to go from here?
If you want to learn more about stroke animations, replication animations or EasyAnimation - those are all covered in chapters of iOS Animation by Tutorials. The 2nd edition of the book includes 3 brand new chapters and updates to the existing content.
If you own the first edition of the PDF book - don't forget to visit your raywenderlich.com profile and download the 2nd edition for free!
If you get to build something interesting based on this article ping me by replying to this email or on Twitter at @icanzilb.